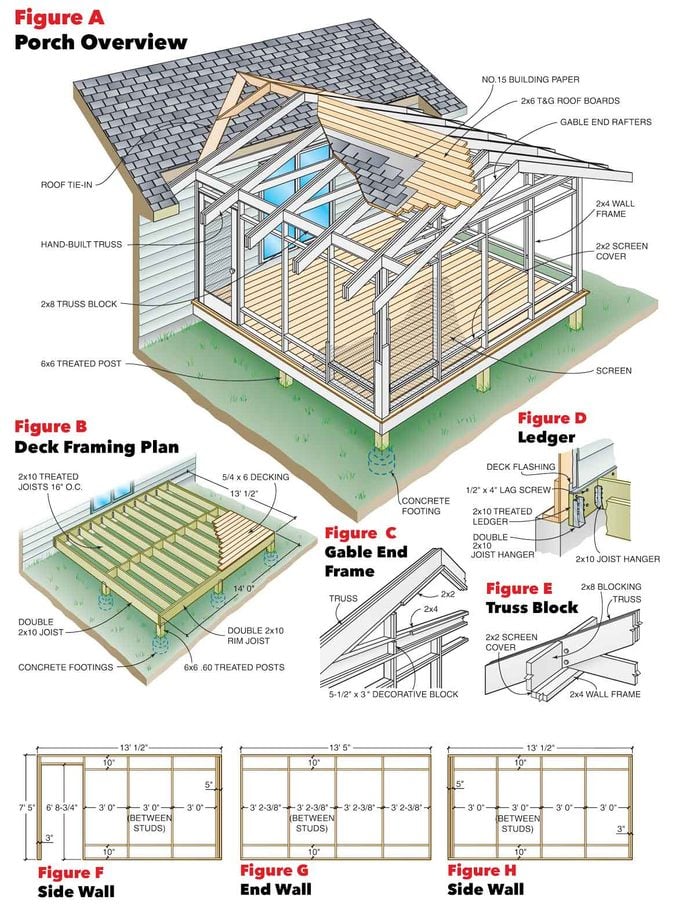
Plan Drawings for Sigle Rafter Porch
How to Build a Porch: Screen Porch Construction
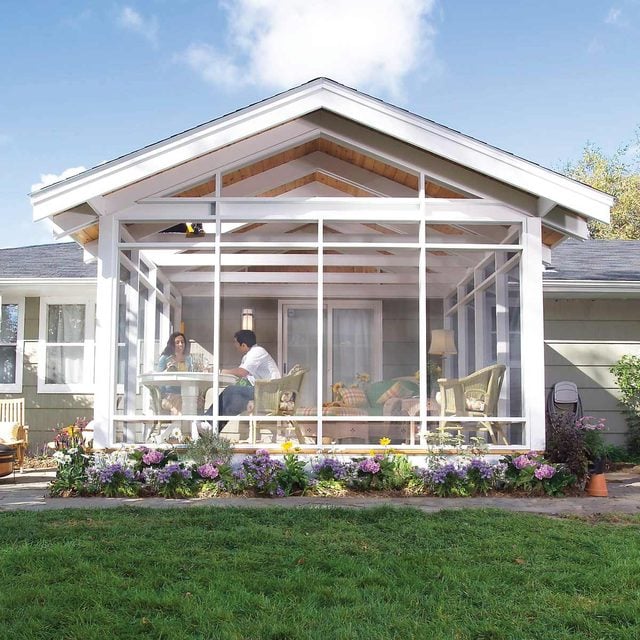
Add an enclosed screen porch to your house using basic framing and deck building techniques.
![]() Time
Time
Multiple Days
![]() Complication
Complication
Advanced
![]() Price
Price
$501-one thousand
Introduction
Yous tin can add a spacious, airy outdoor porch to your home. We'll testify you everything you need to complete the project yourself, including how to frame the porch, attach it to your firm and all of the finishing details. Sure, information technology'll have a lot of time and work, only in one case it'south washed, y'all tin beat the bugs and spend more time outdoors during the summer.
Tools Required
Roll up your sleeves!
A screened in porch is a large comeback, merely edifice a porch is also a big project, i that might eat most of your spare time this summer. Then, we're keeping this how to build a porch blueprint simple.
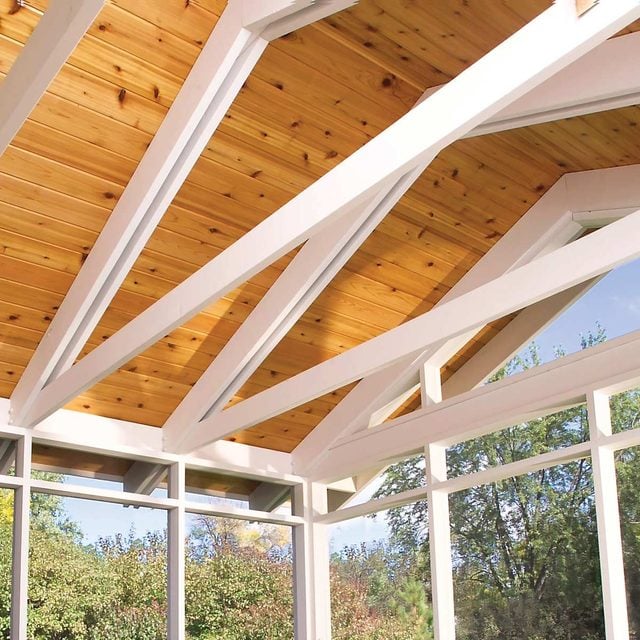
Simple ii×four wall structure.
You can build it with standard dimensional lumber, and information technology doesn't require heavy beams or complex joints. The unproblematic two×four walls are low-cal and airy looking. Two horizontal bands of 2x4s fix ten in. from the top and bottom of the wall, add together a design element and stiffen the 2×4 framing enough to back up the hand-built trusses.
With this how to build a porch design, there's no need to precisely align the overhangs. And the exposed rafters and open soffit await great on many business firm styles. Plus, to create the optimal relaxation spot for your porch, endeavor out these 10 tips.
The full cost of this how to build a porch was $six,500, merely y'all could salvage hundreds of dollars without sacrificing quality by substituting treated decking for the cedar or using natural language-and-groove pine rather than cedar on the ceiling.
Straight forward construction.
Even though how to build a porch project is a large project, near of the construction is straightforward. If yous've congenital decks or sheds, you lot'll be able to tackle this job with conviction. In this how to build a screened in porch article, nosotros'll bear witness y'all the key steps for building this porch. Study the drawings and photos for more details.
The tools you lot'll need:
The screened porch offers a nearly unobstructed view of the outdoors and y'all'll need a full set of basic carpentry tools, a round saw and a drill to build this porch. In addition, a reciprocating saw, a tabular array saw and a ability miter box will make the chore go quicker and requite you better results. To reach loftier places safely and easily, we recommend renting a rolling scaffold system for a month.
Project step-by-pace (21)
Step 1
Plan ahead to avoid construction headaches
You can add together this screened in porch to virtually whatever business firm, simply attachment details may vary from what we show hither.
- On most two-story houses, yous won't have to worry nigh tying into the roof, but you may accept to situate the porch carefully to avoid covering a window.
- The business firm roof sloped 5 in. per foot (this is chosen a 5/12 slope) and extended 18 in. at the overhang. Your roof may vary from this, and the details of how the porch ties in will vary besides.
These illustrations above show the plans for the screened in porch, deck framing, gable framing, ledger, truss cake, side walls and the end wall. To print these how to build a porch programme, come across Additional Information at the end of this story.
Step 2
Tips for joining the screened in porch and house roofs
If you're not certain how to neatly join the screened in porch and house roofs:
- We recommend hiring an builder to help piece of work out the details.
- Some other option is to build a total-size mockup of a roof truss out of cheap and lightweight 1x4s. Figure out where the summit of the wall plate would be if y'all built the porch according to our plans (Figures A – H). And so back up the mocked-up truss at this acme to see how the porch overhang meets the roof.
- If you lot don't similar the way the overhangs intersect, adjust the level of the deck slightly, modify the wall height or change the width of the overhang.
- Contact your local building inspections department to find out what'southward required to obtain a building let.
- Starting time this process at to the lowest degree a month earlier y'all plan to build. This volition permit enough time to work through potential bug.
![]()
Step 3
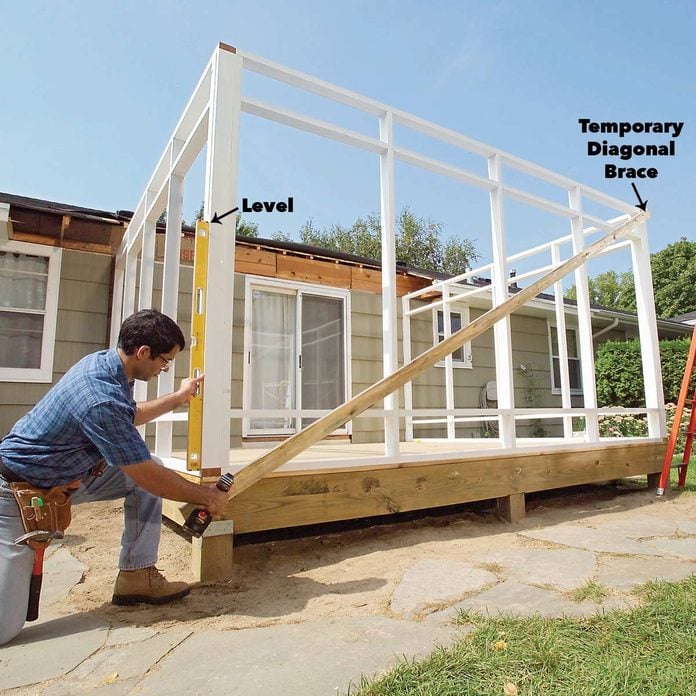
Build the deck square and level and gather the perimeter joists

Install the ledger board.
Start by mark the ledger board location on the house wall. Nosotros located the peak of the ledger lath 90 in. below the bottom of the soffit. On our house, this left a 6-in. pace downwards from the patio door to the deck surface. Remove the siding and attach the ledger with one/2 x 4-in. galvanized lag screws (Effigy D). Make certain it'southward perfectly level. If the ledger attaches to concrete, predrill holes and insert lead shield lag spiral anchors before installing the lags.
Outline deck frame and set beams.
After y'all mountain the ledger, use stakes and string lines to outline the deck frame according to the dimensions in Figure B and mark the footing locations. A few days earlier you plan to dig the footings, call 411 to have underground utilities marked in the vicinity of the porch. Your local building department will specify how big and deep the footings should be for your climate and soil weather. Cascade a concrete pad in the bottom of each footing hole afterward they've been inspected. Allow the concrete fix overnight.
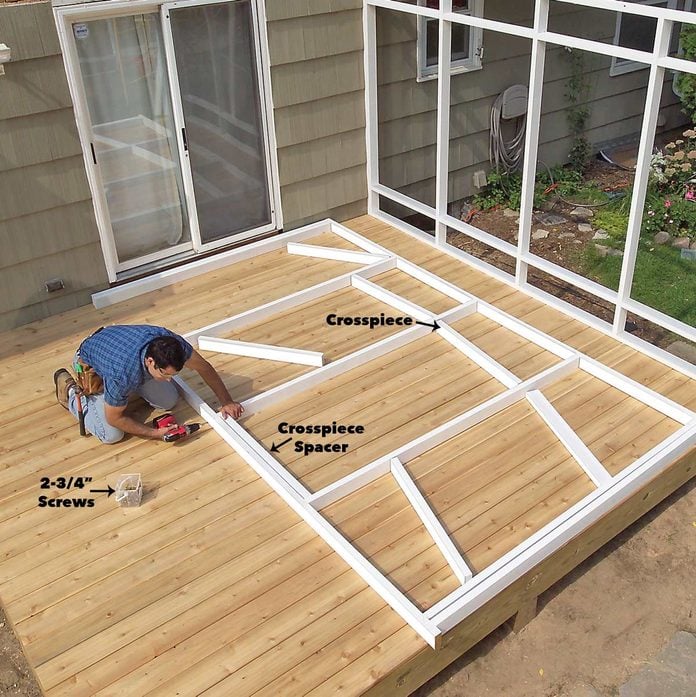
Assemble Frame.
Side by side, choose the six straightest 2x10s for the perimeter beams. Cut the 2x10s for the 2 side beams to length and nail the pairs together. Use 16d stainless steel or double-dipped galvanized nails for all of the joist framings and to adhere the joist hangers to the ledger board. Remainder one end of each side axle in the double joist hangers and prop them up until level with a stack of forest.
Pace four
Install the joists and joist hangers

Boom through the joist hangers into the beams at the business firm to hold them in place. Then connect the opposite ends of the two beams at the front with a 2x10 cutting to the same length as the ledger. Adjust the resulting frame until the diagonal measurements are equal.
And so brace the frame against stakes pounded into the basis to concord it foursquare while you install the treated posts, joists and decking. Sight along the outside rim joist occasionally and adapt the length of the joists as needed to keep the front rim joist straight.
Step v
Cut abroad the overhang and siding to make way for the porch

You'll take to determine whether to cut a slot where the porch walls run into the siding. If your siding is stucco, brick or stone, you may want to butt the walls to the siding.
Make a mark one-5/eight in. out from the deck on both sides. Then make another mark v-1/8 in. inside the offset marking. Draw plumb lines up from these marks and cut a 5-ane/8-in. slot through the siding but not the sheathing. Set the saw blade but deep enough to cut through the siding only. Remove the siding. Waterproof the slot with No. xv building newspaper.
Pace 6
Cut away the roof

If your house has an overhang, you'll have to cut it dorsum flush to permit the innermost truss to fit against the wall. Start by removing the soffit and fascia boards above and several feet to each side of the deck. It's easier to remove extra soffit and fascia boards and patch them back after the porch is done than to calculate cutoff points now. After the soffit boards are removed, employ a level to plumb up from the firm wall to the underside of the roof boards, in line with the outside edges of the porch.
Mark the two points. So bulldoze a long screw or nail up through the roof boards at the two marks. Snap a chalk line between the nails and remove the shingles below and nearly 6 in. above the line. Chalk a new line and remove nails along the line. Then saw along the line and pry off the roof boards. Be certain to wear rubber glasses and hearing protection when y'all're sawing. Finally, cut off the rafter tails flush to the house wall.
Step 7
Construct a jig to assemble the roof trusses

Prime number Earlier Painting.
Prime and paint the truss parts, wall frame and screen stops earlier assembly. Prime the woods with a special stain-blocking primer such as Zinsser'southward oil-based Cover-Stain. Then brush on a coat of acrylic exterior house paint. Make certain to prime number every cut terminate as yous piece of work; otherwise, these areas will blot moisture and cause staining. We prefinished the roof boards with an oil finish (Cabot Clear Solution Natural).
How to construct the roof truss jig:
It's easiest to get together the roof trusses get-go, using the deck platform as a piece of work surface. Screw two sheets of plywood to the decking and use the dimensions in Figure J to chalk lines indicating the top of the rafters and the bottom of the 2x6 crosstie. Cutting triangular blocks and screw them to the plywood to hold the rafters in alignment as y'all assemble the trusses.
Step eight
Build the trusses

How to use the jig:
Cutting a rafter using the dimensions in Figure J and utilize it equally a pattern to mark the remaining rafters. Place a pair of rafters in the jig and screw the tops together. Next screw the 2x6 crosstie and 2x8 spacer to the pair of rafters. Keep the crosstie screws clear of the bolt hole locations. Complete each truss by screwing another pair of rafters on top.
Assemble the rafters and trusses.
Check the ends and tops of the rafters every bit you assemble the trusses to brand sure they're perfectly aligned. The trusses must be identical so that your roof boards and soffit trim will line upward. Finally, elevate the truss on blocks of wood while you lot drill a pair of 1/ii-in. holes into each end of the crosstie for the carriage bolts (Effigy J). Run the i/2 x 5-1/2-in. carriage bolts through the rafters and crosstie ends and tighten the basics.
Footstep 9
Frame the walls accurately for smooth assembly
Since the wall framing for this screened in porch is the finished surface, it'due south worth taking a little extra fourth dimension to make the framing textile look good. We chose the nicest cedar 2x6s nosotros could find and ripped them into 3-i/2-in. and 1-1/2-in. boards. We did this to create sharp, clean edges (we besides ripped off all the factory rounded edges).
Cut the studs and crosspieces to length and screw the walls together (Figures F – H). We used a power miter saw for clean, foursquare cuts, but a circular saw will piece of work also. Utilise a crosspiece as a spacer when you lot're attaching the studs to the superlative and bottom plates. Then cut a ten-in. spacer block to position the crosspieces for assembly.
Stride 10
Plumb and brace the walls
Stand up the walls and screw the wall corners together. The key to standing the walls is to check and double-cheque along the mode to make certain they're straight along their top and bottom plates, perfectly plumb and foursquare, and securely braced. Beginning by positioning the walls with their outside edge flush to the deck and screwing them down. Next, screw the corners together, making certain the top plates of next walls are even with each other. Use a long level to plumb the walls while you adhere diagonal braces to hold them in position. Leave the braces in place until subsequently the roofing is consummate.
Step xi
Attach the Trusses
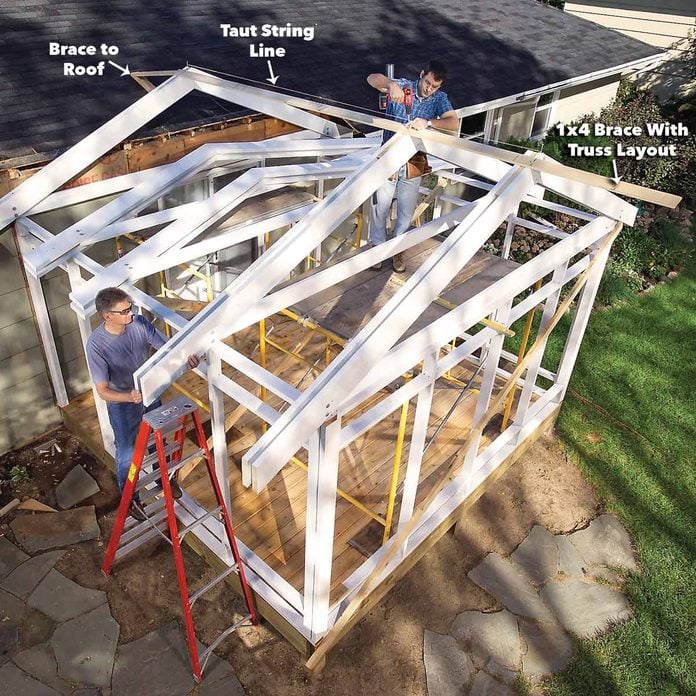
You'll need helpers for this stride.
Round upwardly a couple of potent helpers to assist in setting the trusses. First past marking the position of the trusses on the top plate and onto a sixteen-ft. 1x4 (y'all'll use the 1x4 to brace and position the tops of the trusses equally you stand them up). The first truss merely butts to the house wall. The outermost truss aligns with the border of the summit plate, and the three interior trusses are centered on the studs below. Ready the start truss against the house and advisedly center it so that 1-1/2 in. of the bottom 2x6 overhangs the summit wall plates on each side.
Installing the offset truss.
Screw the truss to the top plates. So utilize a straightedge and level to stand the truss perfectly plumb and brace it to the roof. Make certain this brace is securely screwed to the roof and the truss because the remaining trusses will be supported past this truss until the roof tie-in framing is consummate.
Install the remaining trusses.
Lift the remaining trusses onto the top of the walls and rest them on the first truss. Slowly and advisedly slide the outermost truss to the outside cease of the porch. Align the marks on the 1x4 with the truss at the business firm and the outermost truss and screw it to the trusses.
Center the outermost truss on the walls and toe-screw information technology to the top plate of the walls. Stretch a string line between nails at the peak of the two trusses. Align the remaining trusses with the string line and the marks on the 1x4 and top plates and screw them in.
Step 12
Line up the tie-in framing with the porch for a seamless blend

One of the trickiest parts of the porch construction is joining the two roofs. The cardinal is to extend lines from the new porch and marking where they intersect the existing roof. Do this by using a taut string line or a long, straight lath. Remember to enhance the tie-in framing on the existing business firm roof ¾ in. to a higher place the porch framing to recoup for the difference in thickness of the iii/4-in. plywood and one-1/2-in. roof boards, so use three/4-in.-thick spacer blocks to raise the line to the correct tie-in framing height.
Stride thirteen
Install the ridge and rafters
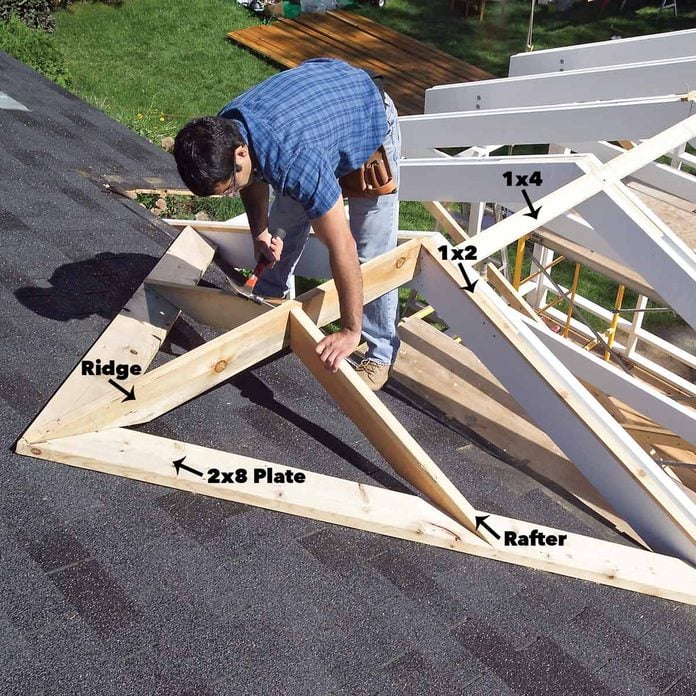
Cutting the 2x8 roof plates. If yous're not skillful at calculating roof angles, start by estimating the angles and cutting the plates an actress 6 in. long. And so fix them in place, remark the angles and recut them until they fit. Screw the roof plates through the roof boards into the rafters below. Next measure for the ridge, judge the angle and cut information technology a little long. Trim the angle to fit and screw the ridge rafter to the first truss and roof plates. Complete the necktie-in by installing a pair of rafters. The framing should exist exactly 3/4 in. above the top of the trusses.
Step 14
Install the roof boards
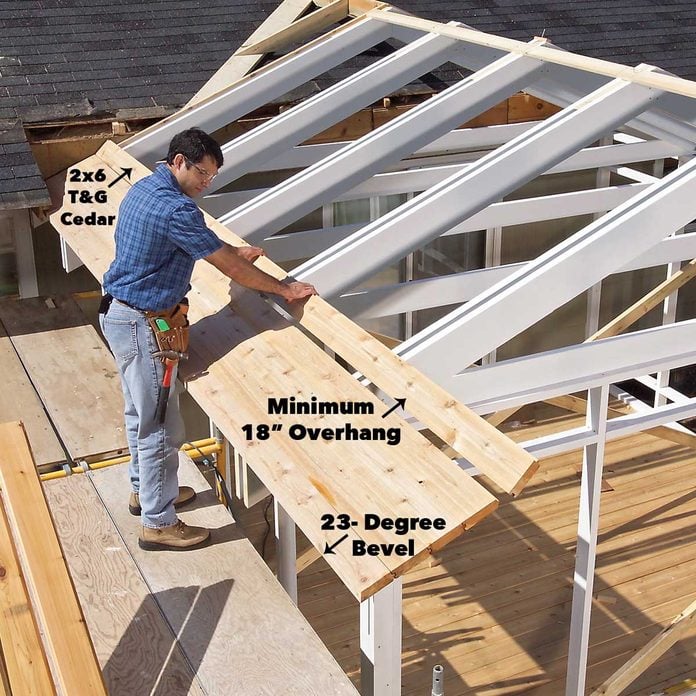
To bevel the first roof board, ready your tabular array saw or circular saw to 23 degrees and rip a bevel on the groove border of the board. Marshal the board with the ends of the trusses and smash it with 16d galvanized nails. Install the remaining boards, making sure to snug the joints tight before nailing them. Let the boards hang out by the last truss to form the gable stop overhang. Cut the final board on each side to fit at the peak.
When you're done installing the roof boards, snap a chalk line at the gable (outer) cease and saw them off to leave an 18-in. overhang. Finish the gable terminate overhang by installing a pair of rafters and the 1x3 trim. Hold the gable end rafters tight to the underside of the cutoff roof boards and spiral through the roof boards to concur the rafters in place. Then cut 1x3 trim to comprehend the end grain of the roof boards. Extend the trim around the corners and return it along the roof border to the house.
Step xv
Pay attention to flashing and roofing details for a watertight job

Edifice the necktie-in framing on elevation of the existing shingles is a good manner to keep the firm waterproof as y'all construct the porch, but when it comes time to install the covering you'll accept to cut the shingles along each of the valleys with a hook-blade utility knife. And so pry loose the cut shingles to make a wide path for the valley flashing.
Cover the tie-in framing with three/four-in. plywood. Add blocking as needed and fill in the triangular areas betwixt the existing roof and the new roof.
Stride 16
Install flashing in the roof valley

We won't go into covering details hither (and so check out our expert guide for how to roof a firm). In general, comprehend the eaves and valley with strips of a waterproof membrane (an water ice-and-water barrier) and install the sheet metal valley. Place covering nails nearly 12 in. autonomously along the edge of the metallic valley. Cut a brusque piece of valley metal to complete the top on each side, overlapping it well-nigh 6 in. onto the long piece.
Staple No. 15 building paper to the remainder of the porch roof, starting at the bottom and working up. Overlap each row iii in. onto the one beneath. Install shingles to match the house. Follow the manufacturer's instructions for starting, overlaps and nail placement. Use 1-in.-long galvanized roofing nails to avoid nailing through the tongue-and-groove ceiling.
Footstep 17
Fill in the porch gable ends
Cover the triangular opening in the truss higher up the business firm wall by building a 2x2 frame and nailing 1x6 tongue-and-groove boards to the back. Then slide the frame into the opening and spiral it into place. Fill the triangular space above the outside wall with a 2x4 frame (Figure C).
And so staple screening to information technology and cover the screens with stops, merely as you do with the walls beneath. Practice on scraps to make accurate patterns for the steep angles. And then transfer the angles to the bodily framing members. You may have to cut these angles with a handsaw; they're too steep for a miter saw unless you build a special jig.
Step 18
Attach trim and sill to the outer walls

Nail a 2x10 trim board over the outside joist, 1-1/ii in. below the top surface of the deck. Cut a 2x4 sill piece to width and bevel the top on a table saw. Miter the ends and nail the sill to the acme of the 2x10 trim board.
Stride nineteen
Trim corner details

This illustration shows how the corners are assembled and the trim is installed.
Step twenty
Staple the screen to the walls
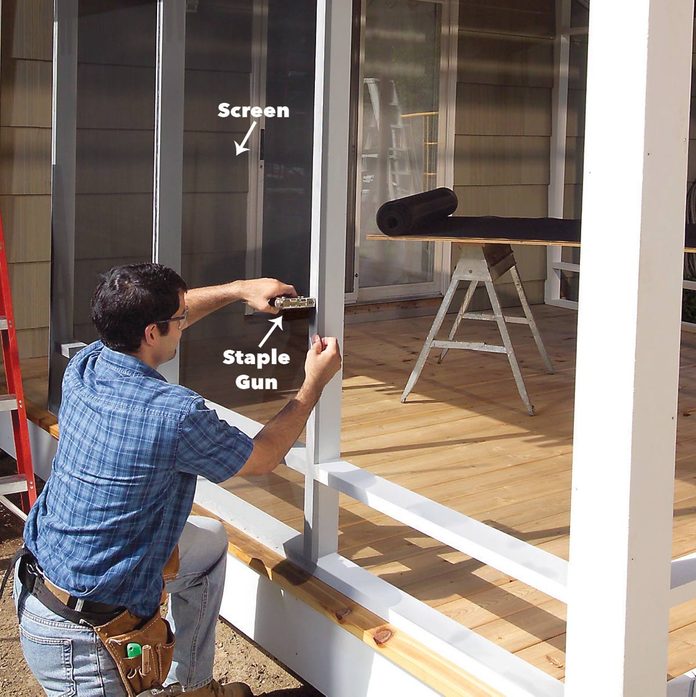
The charcoal aluminum screening we used is strong and long-lasting, only y'all have to handle it carefully to avoid creases and dents. Carefully unroll the screen on a large work surface and cut lengths about 3 in. longer than you demand. Reroll each slice and carry it to its location.
Start by tacking the two corners, making sure the screen is square to the opening. Then stretch the screen slightly and staple the sides, elevation and bottom. Place i/4-in. staples every iii in.
Stride 21
Attach 2x2s over the framing

After you stretch and staple each section, cut off the excess screen with a sharp utility knife. And so cover the edges with 2x2 trim pieces. We screwed these on to allow for easy removal for future screen repairs, and the trim covers the staples along all of the edges. Frame and screen the outer gable end post-obit Figure C.
Screen door details:
If you use a wood door like ours, start past trimming it just enough to fit in the opening. Then set information technology in place and marker the door for final fitting. Employ a precipitous plane or belt sander to trim the door. You may take to repeat this process a few times to get a good fit.
Boom i/2 x 2-in. woods stops to the framing at the door opening. Then hang the door using galvanized or brass screen door hinges. Mount a latch and door closer to complete the task. Plus, check out these other x inviting screen porches, rooms and lanais.
Additional Data:
- Porch Plans
- Materials List for the Porch
Originally Published: March 21, 2019
Source: https://www.familyhandyman.com/project/screen-porch-construction/
0 Response to "Plan Drawings for Sigle Rafter Porch"
Post a Comment